News, reviews, and updates from the estate.
Cooking with Crosby Roamann: Sourdough Baguettes

Every other week or so as I prepare our weekend bread, I decide to alter the recipe just a little bit, and more often than not, that alteration simply leads to baguettes. They're a little more difficult to make, and a little more work, but they are delicious straight out of the oven, they store well for a day (if they even last that long) and they freeze very well wrapped in plastic wrap and defrost easily, extending the amount of time you can enjoy them. The only slight complication is that you will need a baguette pan to make them – but you can find one HERE.
The other consideration when we are making baguettes is the flour. I am one of the roughly 35% of the US population with a gene variant that prevents my body from methylating Folic Acid (a common ingredient in "enriched" flour). From Gemini: "It's estimated that up to 50% of people may have a genetic variant, specifically a polymorphism in the MTHFR gene, that reduces their ability to convert folic acid (the synthetic form of folate) to its active form, L-methylfolate. This can affect their ability to properly absorb and utilize folic acid, including that found in fortified bread."
My problem is that when I ingest products that are "enriched" with Folic Acid, I feel kind of disgusting -- bloated, gassy, etc. TMI? Sorry!
I've found that it's really rather common for people with this gene variant to complain about how they feel after eating domestically produced bread and pasta (the pasta! ugh...) but then when they go to ITALY, it's a totally different story. In Italy, I am told, the wheat -- how it is grown and produced and packaged -- is all totally different, and it doesn't contain Folic Acid. Maybe you’re like me, maybe not, but I could eat pizza and pasta every day in Italy and not feel sick...well, not as sick, or sick but just in a different way, like from over-eating because it's so good
So with all that in mind, I have been looking for a way to incorporate a similarly healthy flour ingredient into my baking and pasta-making. Something that I can enjoy without feeling guilty and sick about ingesting all that gluten.
Enter – organic flour. I have been rotating three different types of flour in our kitchen for our breads in general. The first is Bob's Red Mill Organic Unbleached All-Purpose White Flour. I have had very good results with this bread, and I’ve never felt “kind-of-off” after eating it. The texture of the dough when mixed with the yeast starter and water has a good texture that is easy to mold and the flavor is fantastic.
We’ve also used Bob’s Red Mill Unbleached Enriched Bread Flour – the trade off here being that is, in fact, BREAD flour, not-all purpose flour, but it is NOT organic, it is enriched. For whatever reason, I have had slightly less good results with this flour – I’m really not sure why.
The other flour really worth a try, however, is the King Arthur Organic Bread Flour. On the surface of it, this should be the perfect product. The only problem is, again – for whatever reason, and I’m really not sure what it is – I just don’t love the texture of the dough this makes as it is formed, and I’m not sure I get the same flavor or texture out of the dough. So, I keep coming back to the Red Mill Organic All Purpose Flour. That being said, the differences are fairly minor, and you will get remarkable results with this recipe with any of these ingredients.
Ingredients:
100g sourdough starter from the fridge (GO HERE for your sourdough starter recipe)
385g very warm water (we use about 110-120F tap water)
520g (organic) bread flour (plus a large pinch for rolling out and shaping baguettes)
12g Kosher salt
Directions:
The night before you plan to bake –
Combine all the ingredients in a large bowl and combine until you form a shaggy dough. The dough will stick to the spoon, your fingers, the bowl – everything. That’s ok! Run a little warm water in the sink and using wet fingers, gently pinch off the sticky dough from the spoon, then wet the spoon, and gently scrape the dough off the sides of the bowl. Combine all the dough in one heap in the middle of the bowl. Using a wet paper towl, wipe down the sides of the bowl – mostly just to clean it up a little bit. Then drape a moist kitchen towel over the bowl of dough and set it aside for 30 minutes.
After 30 minutes, you’re going to perform your first “turn” of the dough. Run some cool water and wet the fingers on your dominant hand. Using your finger tips and wet fingers, scrape the sides of the dough down from the bowl. When the sides of the dough have been released from the bowl, wet your fingers and scrape up the bottom of the dough from the bottom of the bowl.
Once the dough is fully released from sticking to the bowl, grasp one side of the dough and pull it straight up about 12-18 inches with your dominant hand, then fold it over the other side.
Rotate the bowl 90 degrees, grasp the thick fold of the dough that you just created by folding it over itself, and once again raise it up 12-18 inches and fold it over itself.
Repeat this process 1 or 2 more times, until you are satisfied that the dough has been fully folded.
The folding process will lengthen and strengthen the glutens in your bread, forming a texture within which the sourdough fermentation process can create lots of little, and some large bubbles, forming the ultimate structure of your bread.
Set a timer for another 20-30 minutes (whatever your schedule will allow) and repeat the entire process one more time. If you’re feeling extra frisky, you can even perform a third turning after another 20-30 minute rest.
At the conclusion of the folding process, cover your bread-dough bowl with a damp kitchen towel and find a nice little quiet and out of the way place for it to rise overnight.
In the morning, your dough is going to look like this:
Unlike our sourdough boule, to make baguettes, we’re going to lightly flour a clean and dry workspace (I like to use a large wooden cutting board, turned upside down).
Once again, run some cool water in the sink, and wet the fingers on your dominant hand.
Once again, using your fingertips – scrape down the bread off the sides of the bowl and gently release it from the bottom of the bowl.
Then gently tip the dough out of the bowl and allow it to fall upside down on the floured work space.
Sprinkle more dough over the top (what was once the bottom) of the dough.
Cut the bread directly in half, and scrape any wet dough off the knife back onto one side of the dough, like so …
Flatten the dough into a 1/2 inch thick and 4 inch by 8 inch rectangle, like this …
Then fold one inch up …
and one inch down like so …
Then fold once more, away from you, in half, to make a 1-2 inch wide rectangle.
Roll the dough away from you one-quarter turn, so the “seam” (i.e., the gap between the folded sides) is now on the bottom, and you have a nice fluffy looking baguette shape, like this …
Using both hands, gently roll, shake, cajole, and pull the dough into your desired baguette shape, then transfer it to one side of your baguette pan and stretch it out to your desired length.
Repeat this process on baguette number two.
You now have two baguette doughs resting in the baguette pan. Let them rest. It’s been a long morning. Have some coffee! You’ve earned it. Cover them with your damp kitchen towel and set them aside for 30 minutes to an hour, depending on how spongy you want them when baked. Go walk the dog(s), or make the beds, hop in the shower, or go to the gym, whatever makes you happy. In about 60 minutes, however, you want to come back to those baguettes and you want to transfer them to the refrigerator, uncovered, to chill for 30-60 minutes. And that’s when you preheat the oven to 500F with one rack directly in the middle of the oven and another rack towards the bottom.
Back at 500F for 15 minutes with a small baking dish with 5-10 ice cubes to hydrate the air in the oven.
At the end of 15 minutes, turn the temperature down to 450 and bake for another 15 minutes. (If the crust isn’t quite golden brown enough for you at the conclusion of 30 minutes of baking, go ahead and try another 2-3 minutes at 450. Sometimes my own oven needs another 2-3 minutes of baking at 450F to get the crust on our baguettes just the way I like it, see picture.)
Cooking with Crosby Roamann: Shepherd's Pie

Ingredients
- 1 tblspn each Olive oil and butter to sauté onions
- 3 Cloves garlic optional
- 1lb ground lamb
- 1lb ground beef
- 1 medium onion, chopped
- 1 box/can of chopped tomatoes
- 1 tblspn each rosemary, sage, thyme, sea salt
- Pepper to taste
- 1 bag of frozen peas and carrots
- 3 medium russet potatoes, peeled, sliced, and boiled for mashed potatoes with butter and sour cream
- 2 cups grated shard. Cheddar cheese

Preparation
- Melt the butter and olive in a large skillet over medium-high heat
- Saute the onions (and garlic) for 10 minutes, just until they start to brown and stick to the pan, then remove the onions from the skillet
- Add the ground beef and lamb together and season with salt and dried herbs, and brown the meat all over, about ten minutes, crushing and turning the meat as you go.
- Add the box of chopped tomatoes and stir to bring the meat and tomatoes all together
- Let this simmer for 15 minutes, stirring occasionally.
- Meanwhile, prepare your mashed potatoes topping by boiling your peeling and sliced potatoes in just enough water to cover them. When they are soft and crush easily (about 10-15 minutes), pour off the remaining water, return the potatoes to the pot, and add about 1/3 cup each of butter and sour cream. Mash these all together with a hand masher and fork for a soft and creamy consistency.
- At the end of the simmer, add one bag of frozen peas and carrots, and bring the mixture all together.
- When the meat sauce and the potatoes are ready, assemble your Shepherd's pie ~ layer the bottom of a 9x13 metal pan evenly with your meat sauce (about 1/2 inch thick), then apply a 1/2 inch thick layer of mashed potatoes on top. Sprinkle the top of the mashed potatoes with grated, shard cheddar cheese.
- Bake at 350F for 35-45 minutes, until the cheese topping is melted, lightly browned, and the meat sauce is bubbling up around the edges of the dish.
Cooking with Crosby Roamann: Sourdough boule with Cranberries and Walnuts
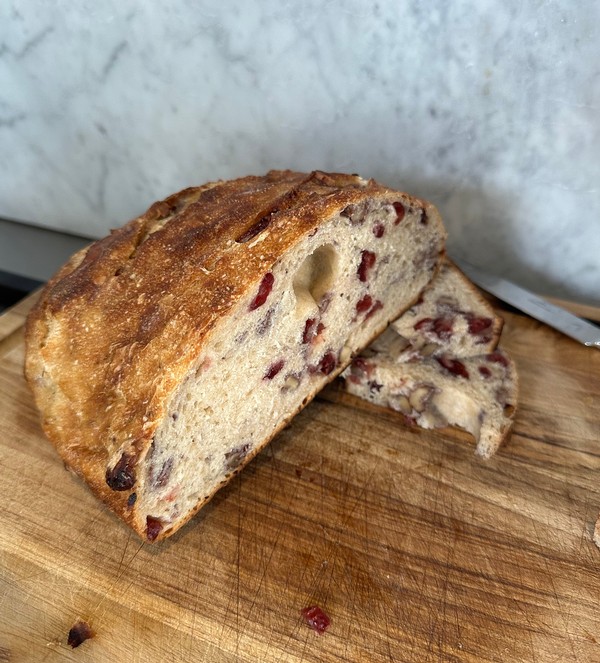
To change things up this week Juliana suggested we add dried cranberries and walnuts to our weekly sourdough. We added a half cup of dried cranberries and a half-cup of chopped walnuts and folded them into the dough as we performed our first three stretchings of the dough. We then let it rest overnight to rise. In the morning, we transferred the risen dough to a clean bowl, chilled it for an hour in the fridge (while the over heated up) and then baked it using our standard recipe from FeastAtHome.com for 15 minutes at 500F covered, and another 15 minutes at 450F uncovered. I found that I preferred this bread slightly toasted and slathered with butter, but then again, I always do!
Cooking with Crosby Roamann: Spring Quiche with Cauliflower, Ham & Gruyere
Quiche starts to make an appearance in our house around this time of year, maybe because it makes such a wonderful Sunday Brunch. We like to include things from our winter garden -- chives, scallions, green onions, dill, and cauliflower -- and pair it with a well-chilled bottle of our Sauvignon Blanc -- as we like to serve it with winter lettuces fresh from the garden.
Our basic pie dough crust comes from Smitten Kitchen (you can find it here). We follow the instructions as closely as we can and always love the results -- a slightly sweet pie dough that matches well with anything from a savory quiche to a Maple Cream Pie.
For our spring quiche filling we use 5 eggs, 1 cup of cream, and 2 cups of grated gruyere cheese, plus two shallots, two cups of cauliflower florets, and one and a half cups of cubed ham steak, sauteed in three tablespoons of butter until gently browned all over.
Ingredients
- Smitten Kitchen Basic Pie Dough
- 5 eggs
- 1 cup of cream
- 2 cups of grated gruyere cheese
- 2 shallots, sliced very thinly
- 2 cups of cauliflower florets, about 1" each
- 1.5 cups of cubed ham steak, about 1/2" cubes
- 3 tablespoons of butter
- 3 tablespoons of olive oil
- Salt and pepper to taste
- 1 tablespoon fresh dill, minced
- 1 tablespoon diced chives, optional
Directions
- Prepare the pie dough and par-bake it, set it aside to cool.
- Reduce the over temperature to 300F
- In a large sauce pan, sautee the shallots, cauliflower, and ham steak in the butter and olive oil, until they are lightly browned, about 10 minutes, stirring along the way. Then set these aside to cool.
- Meanwhile, combine the eggs and cream in a medium bowl and whisk to combine. Add the cheese.
- When the cauliflower mix has cooled slightly, add this to the bowl of eggs and cream. Add the fresh dill, and stir to combine. Add the chives if desired.
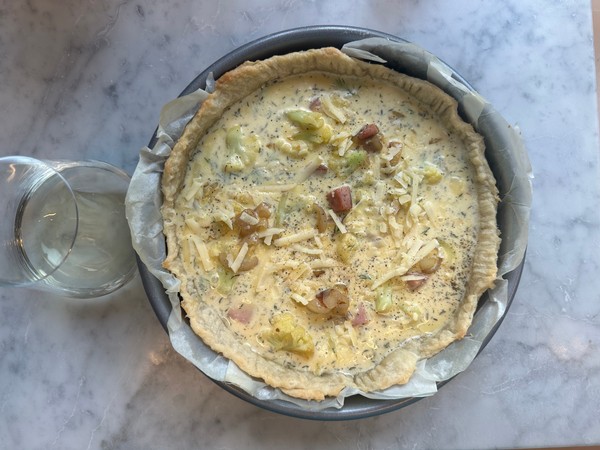
- Set the pie shell in a rimmed baking sheet (for ease of transport).
- Fill the pie shell to the edge with your quiche filling, and transfer it to the middle shelf in the oven.
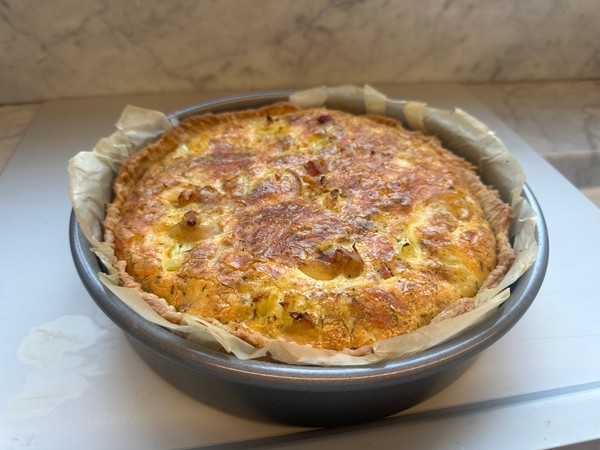
- Bake for 50 minutes at 300F, or until a knife inserted in the middle comes out clean.
Enjoy with a nicely chilled glass of our Sauvignon Blanc.
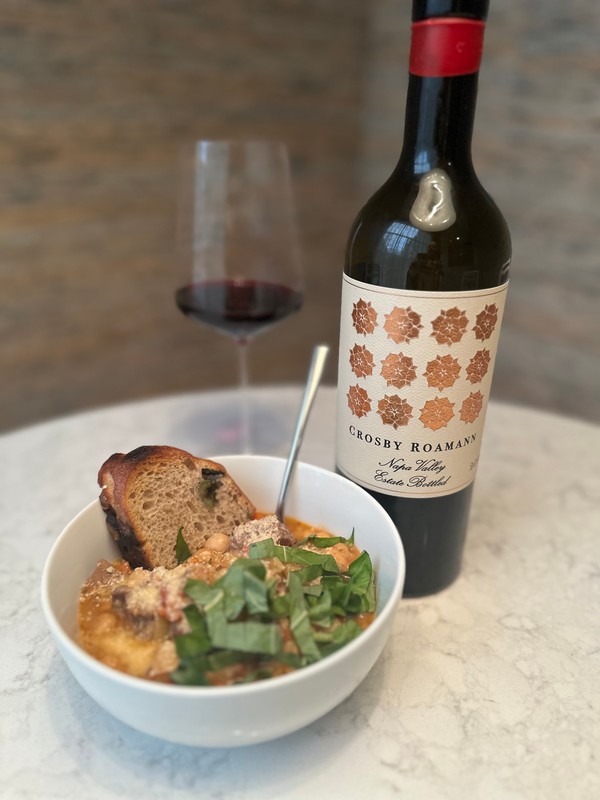
Cooking with Crosby Roamann: Lamb Stew with White Beans paired with Estate Red wine
INGREDIENTS
- 4 clove garlic, sliced very thinly
- 2 carrots, chopped into ½” pieces
- 1 celery, chopped into ¼” pieces
- 1 onion, chopped ¼” pieces
- 1” peeled fresh ginger, chopped (optional) diced
- 1 box chicken stock
- 1 can diced tomatoes
- 2 dashes Tobasco
- 1 cup dry white wine
- 2 lb. boneless lamb shoulder
- 1 lb. mild Italian sausage links
- 1 lb. dry Northern white beans, soaked overnight
- Kosher salt and pepper
- Chopped flat-leaf parsley or basil and crusty French bread, for serving
DIRECTIONS
- Hydrate beans overnight, rinse and clean
- Preheat the oven to 350F.
- In a large saute pan, sauté carrots, celery, onion, garlic, and ginger, just lightly ~ 5 minutes
- Add the wine and reduce to simmer to burn-off alcohol ~ 5 minutes
- Combine the sautéed garlic, carrots, celery, onion, and ginger with the white beans in a 5- to 6-qt Dutch oven, and cover with chicken stock (top with water if necessary).
- Return the saute pan to the heat and add another 2 tablespoon of olive oil. Season the lamb with salt and pepper, and working in batches, slowly brown the meat before adding it to the dutch oven.
- When you have added all the lamb to the dutch oven, and tucked the meat in nicely with the beans, cover the Dutch oven and put it in the oven to cook on 350F for the first hour.
- Have a glass of wine!
- While the lamb is cooking for the first hour, sauté the sausage links briefly next, then let them cool. Slice them into 1 inch pieces on a bias, and at the end of the first hour of cooking lamb, then add the sausage pieces to the dutch oven.
- Add the tomatoes and gently mix everything together.
- Cook 1-2 more hours on low to combine. The lamb should be soft and easy to pull apart with a fork.
- Sprinkle with the parsley or julienned basil, and serve with our sourdough boule.
Spring/Summer 2025 Membership Release

We are tremendously excited to share our new releases with you. The recommended package of new releases from Napa Valley will include our 2023 Sauvignon Blanc, 2022 Reserve Chardonnay, and 2022 Estate Bottled Red Wine, but as always, you can customize your shipment simply by responding to this email or reaching out to Sean or Juliana directly. Shipments will begin the third week of March, weather permitting.
With love from Napa Valley,
Sean & Juliana
2023 Sauvignon Blanc Napa Valley
We gently whole-cluster press the fruit and ferment the juice in concrete on native yeast for five weeks. The wine then ages seven months in new oak barrels and stainless steel drums. Mellow aromas of acacia and peach juice. White rose, lemon-lime, and vanilla bean, with a soft and lingering finish reminiscent of apricots and white plums. Delightful now, the wine will gain complexity and depth over the next five years.
2022 Reserve Chardonnay Napa Valley
We pick our Chardonnay by hand, at dawn. The grapes are whole-cluster pressed and the juice fermented in one-half new French oak barrels for eightteen months. Full bodied, with bright, fully tropical notes -- pineapple, apple juice -- and vanilla on the nose, and a softly-integrated almost anise-seed like note on a juicy finish.
2022 Napa Valley Estate Bottled Red Wine
Our estate vineyard is planted to a proprietary blend of Merlot, Cabernet Sauvignon, Cabernet Franc, and Petit Verdot, in a sand-based Haire clay loam soil on a slight eastern-facing slope. We harvest at the pinnacle of phenolic ripeness to ensure a lush, concentrated, and structured red wine that will age for over a decade. We manually sort the fruit for quality, and ferment in stainless steel tanks for an extended period. The young wine then ages twenty-two months in all new French oak barrels. Delicately sweet blackberry flavors with notes of soft leather and tobacco, coccoa and dark roast coffee that lingers on the finish.
Harvest Updates: The end of harvest -- Cabernet Sauvignon (Part 2)
Part 2: It's been such an incredible vintage I don't even know where to begin with extolling 2024's virtues. Extremely high sugars and low pHs with lots of acidity on the midpalate that is balanced (at least in the wines that are just finishing fermentation now -- our Merlot blocks, Cabernet Franc, Petit Verdot, and our Block 1 Cabernet Sauvignon) by a wonderfully rich and sweet midpalate, and a finish that goes on for days. These will be some of the biggest wines we have produced since 2018, with the classic vintages of 2019, 2021, and 2022 taking a bit of a backstage place, and just (I think and hope and believe) edging out 2023 as the finest vintage since 2016.
On the 2024 Vintage
Dear friends,
Harvest is slowly coming to a close here in Napa Valley, and so far, I have to admit, it's been exceptional. The late spring and early summer were mostly hot and bright, forecasting strong vegetative growth for next year. Towards the end of July the temperatures began to cool, and we had a generally mild and temperate August. Despite about a week and a half of particularly hot and arid temperatures in mid-September, the end of the summer has been classic, dry, balanced, and moderate, allowing even ripening in all of our vineyards.
We harvested our estate Sauvignon Blanc on September 4, with great sugar and acidity, and a near perfect pH of 3.2. Chardonnay was harvested on September 12, and from the beginning we were incredibly excited about the potential in this year's fruit -- juicy, peachy, tropical, everything I was hoping for. We pressed the Chardonnay to mostly new French oak barrels and the wine spontaneously began fermentation within three days. We followed Chardonnay in the Petaluma Gap with Pinot Noir on September 19, from our La Tâche clone in limestone-laden deep Haire loam soils.
Returning to Napa Valley on October 2, we harvested Merlot from Block 3, followed by Block 2 Merlot on October 4, together with our Cabernet Franc and Petit Verdot. A portion of Block 2 Merlot, and all of the Cabernet Franc and Petit Verdot were co-fermented due to the excessively low yields we received, both as these vines are still quite young and have yet to set a full crop, as well as because we dropped about 30% of the fruit set to support and encourage full development of the remaining crop and thus maximize quality throughout the vineyard.
We started to harvest Cabernet Sauvignon on Saturday, October 5, together with all of our estate olive trees. As our fermentation tanks were then full, and the wonderful, sweet aromas of fermentation greeted us every morning for the past three weeks, we took this moment to let the balance of our Cabernet Sauvignon continue to ripen in the vineyard. Our next harvest came on October 18, with our Clone 337 Cabernet Sauvignon, which in recent years has formed the backbone ("structure") of our Reserve Cabernet program.
While the Sauvignon Blanc, Chardonnay, and Pinot Noir have all finished primary fermentation, both the Chardonnay and the Pinot Noir are continuing through malolactic fermentation now. As is customary, malo was halted in the Sauvignon Blanc after three weeks. We are continuing to stir all of these barrels weekly. As a side note, it's a great time to visit the winery to taste these "bright young things" from barrel, as they are still so pungent, racy, and yeasty.
The Merlot tanks, as well as the co-fermented Merlot/Cabernet Franc/Petit Verdot tank, are still struggling through the end of fermentation -- these are truly the nail-biting moments for me personally, as we check the sugars every morning to see if they are still "moving." We are keeping the tanks hot, and pumping them over each day briefly, to encourage the wines to finish dry. All I can say is, it's in God's hands now, and I find myself praying a bit more than usual.
As many of you know, our winemaking style has continued to evolve over time. There is an old saying in this industry that winemaking is a journey, not a destination, and it could never have been more true than it has been for us. In the beginning of this adventure, I was interested in making the most balanced wines, led by the wines I had loved when I first started working in wine retail in college -- wines like Ridge Vineyards "Monte Bello" Cabernet Sauvignon and Chardonnay. I was interested in making truly "American" wines, so like they did at Ridge, I played with a lot of American oak, and these are still some of the most interesting wines we have ever made -- and some of our favorites come from this period.
Over the following years, we experimented with a number of different styles. From 2012-2016, our wines became a bit more flamboyant, robust, juicy and full. 2017 was a classic vintage, but 2018 was very much in this style; I think of these as a sort of plateau during that period in style. Contemporaneously, however, the Pinot Noirs we were making became more and more restrained. During this period we saw the creation and release of the "Sean W. McBride" wine label -- something that I think I had to do in order to better understand my goals as a vigneron. 2019, the off-year of 2020, and 2021, were a return to a more balanced, elegant, and leaner-style of winemaking, influenced as I had been in the previous period by the winemakers I had been moonlighting for (I'll leave out any name-dropping, as insightful as that may seem).
And then, with the 2022 vintage, we had the revelation of what direction Crosby Roamann would be going in the future, and this happened to coincide, perhaps not incidentally, with the purchase of our own vineyard in 2020, and the release of our first estate white wine.
The vintages of 2022, 2023, and now 2024, have been marked by what I might refer to as a modest style of winemaking -- I have tried to take my "ego" entirely out of the winemaking process. This isn't about me, after all is said and done, it's about the wines, and I think that's what I learned by developing a brand under my own name. Crosby Roamann isn't about me, it's about great wine, and that's all, and that's what I am committed to, each and every day -- truly great wines.
And with that in mind, some thoughts on what to expect from the 2024 vintage wines: I am already drinking them from barrel, and enjoying them, which is saying a lot, I think. Young wine, you have to understand, usually needs time in barrel to develop, to mature, to soften, to come together -- that's why we spend so much money on barrels and wait so long for the wines to develop in them. And the fact that I’m enjoying them while they’re still so young, is rare.
By way of example, when Chardonnay is young, it is usually tight, reductive, and yeasty, with angular flavors. When I was first starting out, I remember learning from a trade magazine, perhaps even the Wine Advocate, that John Kongsgaard, the veteran and legendary winemaker of his eponymous wine label, said of Chardonnay that you needed to let it die, and then you needed to resurrect it, and in some ways I believe this may be true, that's why you need to stir the barrels and let it age, often for up to 18 months -- but all I can tell you today is that I am drinking this damn thing right out of the barrel at about six weeks of age and it is the most intriguing Chardonnay I have ever tasted so young, and I simply cannot express my excitement about the wine it is going to mature into by 2026!
The Sauvignon Blanc is robust and sumptuous, with our peach-syrup estate flavors but a strong backbone of acidity. The Pinot Noir is balanced and elegant, even as it is finishing malolactic fermentation and developing that warm, buttery flavor that malo always has when it's young. It's spicy with some concentrated herbal notes that herald a nice complexity.
And it's still too young to truly discuss the estate red wines, but by all measures, they stand to be some of the most complex and voluptuous wines we have ever produced, God willing.
Just a couple more final thoughts: Thanksgiving selections are available online. Please find them here.
Also, the Fall/Winter 2024 Membership is still available for a limited time. Please join the Membership here. Joining as a Member is the best way to support our winery. Receive FREE Shipping, 10% discounts, the annual Member gift, and FREE Tastings when you join the Membership.
I'll end it there. It's been quite the morning, and a bit of a trip down memory lane.
With love from Napa Valley,
Sean W. McBride
PS: You might have noticed that the format of this email is a bit different from those of the past, and perhaps a bit of an explanation is due, if only to give credit where credit is due -- Some friends/members of the winery visited for a tasting recently, as they have been every autumn for the past couple years, and they suggested that we send this simple text email, and make it more personal, such as it is. So we decided to try it this time around. Let us know what you think? Personally, we still kind of enjoy designing the more visually exciting announcements, but they do tend to lend themselves more to a "marketing" style of communication, and I've always personally found I prefer the direct communicative style.
Harvest Updates: The end of harvest -- Cabernet Sauvignon (Part 1)

Part 1: Harvest comes to a close on 2024 today with the last block of our Cabernet Sauvignon, with Orion high in the southwest sky and a full moon overhead. And now that harvest is over, queue the music, this is when I get all melancholy and reminiscent about all the things that could have gone wrong but didn't and happened to go right, or maybe I'm just exhausted today. We started at 4am and pulled in 3.0105 tons of Clone 337, which tends to be our "reserve" grade selection which will ferment in Beta Tank, and 2.019 tons of Clone 169 which will ferment in Alpha Tank and likely will form the backbone (i.e., structure) of our Estate Bottled Red Wine.
Harvest Updates: Merlot, Cabernet Franc, Cabernet Sauvignon, Petit Verdot
Happy to report: It's been a delightful harvest so far. We harvested our Merlot, Block 3, on October 2, followed by Block 2 Merlot on October 4, along with our Cabernet Franc and Petit Verdot from Block 1 the same day. We returned Saturday October 5 and harvested the remainder of Block 1 -- all of our Cabernet Sauvignon, along with our olives. Almost all of the Merlot was destemmed to individual tanks, but for two macro bins that were blended with our Cabernet Franc and Petit Verdot for a field blend primary fermentation, and the Cabernet Sauvignon is fermenting separately.
The flavors are off the charts, and it's really quite exciting, as the grapes are undergoing a seven-day cold soak prior to primary fermentation.
